Tiago 17:18 30th August 2011
Hi,
some days ago we talked about macro photography.
I got the lens inverter (52mm) for my nikon lens fix 50mm
i gave it a try and it transforms the fix 50mm (no macro) into a macro lens,
the result was quite nice, but very difficult to focus. But it isn't better then a orinal macro lens.
Maybe with an extention tube (i am waiting for one).
anyway, i am starting to build a light box to have a proper setup for macro shoots,
i got 2 old boxes (from PS3 and my toshiba) and start to build a box with windows from those 2.
i will put something at the windows, tissue paper or other material, dont now yet, but i will have to try
to see what gets better results.
anyone tried a light box before:
Examples:
http://ohsheglows.com/2011/01/26/how...e-a-light-box/
http://www.digital-photography-schoo...ive-light-tent
[Reply]
Harrison 20:42 30th August 2011
I've built many light boxes over the years. Best material to use is thin cotton or similar as it resists the heat from lights behind it. If you use paper or tissue paper it can start to singe.
You can also experiment with colours by using coloured gels over the lights. Also using daylight bulbs is better as it produces a purer light, or LED lights, but I've not tried those out yet myself.
Marco photography definitely is a great thing to play around with.
[Reply]
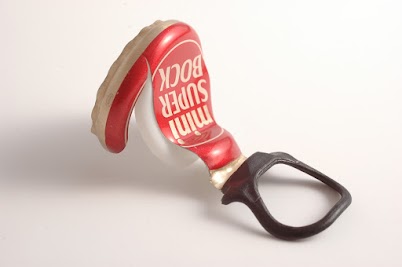
Tiago 12:13 31st August 2011
thank for the info,
here is a photo i took yesterday in the light box, not yet ready the box, but half of it...
i can have a lot of light inside ony with 1 light source, i have some trouble with the background white color, i wanted pure white, but when
i got that pure white, colors in the object tend to go in the same direction...
I need a lot of time to learn...
anyway here it's a first experiment:
 [Reply]
Harrison 13:25 31st August 2011
You need to set the white balance in your camera to the background lighting in the scene/box before you begin, then add the objects you wish to photograph.
A very simple solution to this is found in this video:
[Reply]
Tiago 17:56 31st August 2011
Tiago 08:54 2nd September 2011
Ok, i did the white balance, went to the WB option and shoot a white wall, the result was much better !!
I shoot the same object, check it out:
before white balance setup

after white balance setup
the links were not working now i think they do...
I still have to get new lights, the one i have in the right side is very good, but the left one is to soft for it.
but it's getting much better.
thanks Harrison... that video was good.
now i must learn and check out the differences in ISO setups
[Reply]
Harrison 11:22 2nd September 2011
Huge improvement.

Just shows you how setting the white balance can make an image look so much better. Often with consumer pictures taken on cheaper cameras with limited or no WB control you will see these issues with the overall WB being completely wrong, especially indoors. But outdoors can have issues too as in bright sunlight you can get a blue cast over everything, which washes out colours and mutes an images. WB is definitely one of the most important settings to always remember to adjust before starting to shoot in any new location.
ISO is a little trickier because it works in combination with the Lens you are using and the other current camera settings. ISO is a precursor to the old film days. ISO was the sensitivity of film to light. The higher the ISO, the more sensitive the film, and the more the film would capture from the same amount of light in a scene. The same is true for digital cameras and the ISO settings they offer. The higher you increase the ISO, the more sensitive the camera's sensor will become to light. The issue, as was also true for film, is that the more sensitive you make the sensor as the ISO rises, the more you will introduce noise and artifacts into the image quality. It is therefore a good idea to try and keep the ISO below 800, and for most images below 400 to get the sharpest and cleanest images. If you are finding you need to increase the ISO to gain enough sensitivity to capture an image then instead try to use a wider aperture to get more physical light into the camera, combined with a longer exposure. In lower light scenes this obviously requires image stabilization or even better a tripod. Higher ISO is the option when you don't have IS or a tripod to hand in low light, or you need to take images of moving subjects in low light where neither of these will work.
[Reply]
Tiago 12:30 2nd September 2011
thanks mate,
great info. this weekend i will try to improve my light box and shoot some more stuff.
[Reply]
Tiago 12:19 5th September 2011
Some more Macros, this time my rail locomotives:

 [Reply]